User Guide


HELMET ATTACHMENT SYSTEM OPTION #1
Located inside zip pocket on upper front panel. Open zipper
HELMET ATTACHMENT SYSTEM OPTION #2
Located inside zip pocket on upper front panel. Open zipper
EXPANDABLE SIDE POCKETS
Located on both sides of the backpack. Designed to fit most water
WAIST BELT ZIP POCKET & MOLLE WEBBING
Zipper pocket for small items on the left side. Molle webbing
LAPTOP SLEEVE
Location: inside front pocket.
TRAVEL / ALPINE GEAR ORGANIZER

HYDRATION SYSTEM SLEEVE

ORGANIZATIONAL POCKETS FOR SMALL ACCESSORIES

MULTIPLE MESH ZIPPER POUCHES


VERTICAL SKI CARRY
1. Open the top side release buckle strap.
DIAGONAL SKI CARRY
1. Open the side release buckle straps, loop around the skis, close and tighten.
SNOWBOARD / SNOWSHOE CARRY
H. Un-thread the straps from the Hypalon® loops in the center of the pack.
ICE AXE CARRY OPTION #1
1. Slide the ice axe through the lower front panel sleeve.
ICE AXE CARRY OPTION #2
1. Pull the lower ice axe webbing loop from the pouch.
POLE CARRIER
1. Loop the lower front strap around the poles, close and tighten.
ROPE CARRIER
1. Place the rope onto the top panel of the pack and open the upper side compression straps.

GEAR COMPRESSION SYSTEM
1. Make sure the detachable side webbing straps (shown in blue) are fixed
WAIST BELT EXCESS WEBBING STORAGE
1. Tighten the belt around your waist and retrieve the webbing end.
HIDE ICE-AXE ATTACHMENTS
1. The upper bungee cord with plastic hook can be hidden behind the

shoulder straps away from the zip and open main zipper.
BENEFIT #1: This design allows equipment to be strapped to the
BENEFIT #2: This design will prevent the rear panel from getting dirty as


HELMET ATTACHMENT SYSTEM OPTION #1
Located inside a zip pocket on the upper front panel. Open zipperpocket and take out the helmet attachment fabric panel. Place
the helmet on the top of the bag and connect the aluminum toggle
attached to the fabric panel through the webbing loops located at
the upper rear of the backpack.

HELMET ATTACHMENT SYSTEM OPTION #2
Located inside a zip pocket on the upper front panel. Open zipperpocket and take out the helmet attachment fabric panel.
Place the helmet on the front of the bag and connect the
aluminum toggle attached to the fabric panel through the
webbing loops located at the lower front of the backpack.

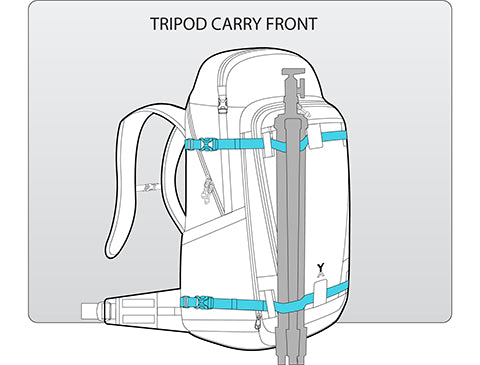
EXPANDABLE SIDE POCKETS
Located on both sides of the backpack. Designed to fit most waterBottles, tripods or items that need to be accessed quickly.

MOLLE WEBBING
Molle webbing on both sides of the waistbeltfor attachment of external pouches or accessories.

LAPTOP SLEEVE
Fits most 15 inch laptops. Foam padded and with Velcro® webbing closure.
POUCHES FOR SMALL ITEMS

TRAVEL/TOOL ORGANIZER
edge in to to hold narrow items in place. Suited to use as an alpine
or avalanche equipment sleeve. Suited to store travel book or other
travel accessories.

ORGANIZATIONAL POCKETS FOR SMALL ACCESSORIES
material for storage of memory cards, filters or other small accessories.

MULTIPLE MESH ZIPPER POUCHES
Location pocket #2: top front pocket.
Pocket #1 comes with inside clip for securing keys.

HYDRATION SYSTEM SLEEVE
upwards. Hydration tube needs to be routed through an opening


on each front side of the bag to give extra 7 cm more depth
(8L of extra space) to the bag when more space is needed.

VERTICAL SKI CARRY
1. Open the top side release buckle strap.2. Insert the ski through the bottom buckle strap.
3. Close the top side release buckle strap and tighten.

DIAGONAL SKI CARRY
Open the side release buckle straps, secure around
SNOWBOARD / SNOWSHOE CARRY
Wrap the straps around the snowboard and tighten.
POLE CARRIER
1. Put botton of poles inside the side pocketLoop the2. Secure top of poles with compression strap and tighten.

SLEEPING BAG CARRY OPTION #1
1.Use the net attachement system locationed2.Attached to top loops then pull backwards over the sleeping bag.
3. Attach remaining 2 hooks in the wedding loops

SLEEPING BAG CARRY OPTION #2
1.Use the net attachement system locationed2.Spread over and cover the sleeping bag and

SLEEPING BAG CARRY OPTION #3
1.Place sleeping bag in side pocket and2.Place the sleeping bag on the side of the backpack

REMOVABLE COMPRESSION STRAPS

DETACHING COMPRESSION STRAPS
1: Locate metal clip on the plastic hook2: push the clip in direction of arrow
3: squeeze the plastic hook so it gives clearance for the metal clip to release
4: slide the strap out of the loop

TORSO HEIGHT ADJUSTMENT
Three height settings available to best fit your frame. For more details see FJORD 60-C
ADJUST WAIST BELT
Pull the webbing of the waist belt inward to tighten.
WAIST BELT EXCESS WEBBING STORAGE
WAIST BELT EXCESS WEBBING STORAGEAfter tightening the belt around your waist and
And push the webbing end into a pouch sewn
is no excess webbing left.


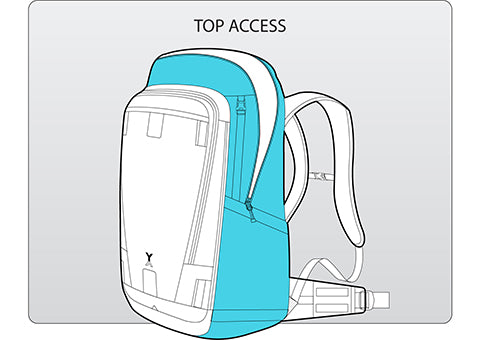
3. Open the top zipper of the backpack. It is important to insert the RCI into
the pack from the top zipper and NOT the rear zipper.
4. You can either store the lid between the back of the RCI and backpack to create a new sleeve or leave the zip off lid behind.
5. Retrieve the Velcro® tabs located on the inside of the backpack sewn
into the rear panel seams and fix the Velcro® tabs to the inside
walls of the RCI. This will secure the RCI to the aluminum frame and
prevent it from moving around.
6. Ready to start packing!

3. Fold the RCI walls into a box.
4. Slide the RCI inside the backpack and ready to start packing!


Download FJORD 36 User Guide
Download FJORD 60-C User Guide
Download RCI User Guide